Know the Ropes: Fundamentals to Save Your Life
Originally Published in the 2014 Edition of Accidents in North American Climbing
Author: Dunham Gooding & Jason D. Martin // Photos: Erik Rieger.
“Slip on Snow.” The phrase seems innocuous enough. It certainly doesn’t sound like something that might lead to an injury or a fatality. But the reality of those three words in Accidents is quite different. If a slip or fall on snow appears in the heading of an abstract, it usually means that something terrible has happened. It might mean that someone has died.

In the last 10 years more than 300 snow travel accidents have been recorded in Accidents in North American Mountaineering. Many, but not all, of these accidents were precipitated by deficient equipment or skills, including “Improper Crampon Use” or “Failure to Self Arrest”; others by illness, exhaustion, or injury; and yet others were the result of objective hazards like avalanches, rockfall, or icefall. Many, but not all, of these accidents could have been avoided had the climbers developed a better understanding of the skills required to move over snow—a dynamic and dangerous setting.
Effective snow travel is a baseline skill that is often overlooked by beginners and advanced climbers alike. In many cases, climbing clubs and even some professional guide services do not spend adequate time teaching effective movement and fall avoidance on snow. This leaves all of these climbers—beginner to advanced—open to the possibility of making mistakes that result in injury to themselves or others.
In the following pages, we will discuss the baseline skills that every mountain traveler must master in order to move efficiently over snow, maximize safety, and minimize risk. For both ascending and descending snow slopes, there are two main techniques that we will address: using your feet and using your ice axe. Effective snow travel requires synchronization of both techniques, matching those techniques to the proper terrain, and ensuring the equipment matches as well. Finally, we’ll briefly discuss strategies for choosing the route, time of ascent, and when to belay or unrope on snow.
USING YOUR FEET
Good footwork is the first line of security against slips on snow. And good footwork requires mountaineering boots, with rigid or semi-rigid soles and ample lugs for traction. (Inadequate footwear is frequently a contributing factor in snow-travel incidents reported in Accidents.) In soft snow, without crampons, there are three recommended techniques. All three can be adapted for use with crampons when snow conditions require it.
Duck Walk
Lower-angle, soft to mildly hard spring and summer snow often allows one to travel effectively without crampons. In this terrain—often up to 35 degrees—the most effective technique is the “duck walk.”
Splay your toes out so that your feet make a V in the snow. As you move up the slope, feet splayed, kick the surface of the snow, using the inside edge of your boot to cut a platform. Move your weight onto the platform as soon as you have cut it, and then repeat the process with your other foot. If your little platform gives way under your weight, kick again and create subsequent steps with a more vigorous swing of your foot to cut deeper into the slope.

Step Kicking
As the angle increases, you will find it more comfortable to kick steps straight into the slope. Step kicking straight up the fall line is more strenuous than moving on a diagonal, but it is an effective way to increase your security. If the snow is consolidated but soft enough to kick good steps, you will have a good platform on which to stand. You will also be facing the slope, which is an excellent position from which to perform a quick self-arrest in the event of a slip.
Diagonal Ascent
If the snow is not soft enough to kick good steps, but is too steep for the duck walk, you may wish to make a diagonal ascent, switchbacking up the slope. The standard technique for moving up a steep slope at a diagonal is to employ a crossover step.
When moving up at a diagonal, there will always be a downhill foot (on the side of your body away from the slope) and an uphill foot (on the side closest to the slope). To move up the slope, cross your downhill foot above your uphill foot and then step up. Now bring the other foot around from behind to return to the uphill position. Once you’ve completed this crossover step, you should be in the same position from which you started. You’ll note that when you’re in the awkward crossed position you’re “out of balance.” When you’re in your original position, you’re “in balance.” If you’re using an ice axe to increase stability, it should be on the uphill side of your body and you should only move it when you’re in balance. Only stop to rest when in balance.
If you have trouble keeping track of which position is in balance and which is not, remember that the position that tends to make you face the slope is out of balance, and the one that tends to face you out slightly from the slope is in balance.
In order to change the direction of your ascent, bring your downhill foot up into an out-of-balance step, and then match that foot in a V position with your other foot, creating a duck stance. From there, make an in-balance step and kick a stance with the new uphill foot, pointing in the new direction. Note that the duck stance is always in balance, so it is possible to switch the ice axe from one hand to the other at any time while securely in that stance.
In harder snow you will have to shear each stance by cutting into the slope with a brisk forward swing of your foot, using a combination of the edge and the sole of your boot. In good conditions you should be able to cut your foot into the slope using a single movement. On hard snow you may need to kick several times to cut an appropriate stance.
Effective Crampon Use
In the past, a number of climbing clubs taught that crampon use was “required” for glacier travel. Thankfully this practice is far less common today, but there are still a lot of climbers out there who believe this to be true.
The reality is you should only wear crampons when the conditions require it. Crampons are dangerous. You can stab yourself with them or catch a point on a piece of clothing and trip. Crampons are required only when you walk or climb on firm snow or ice. It doesn’t matter whether you are on a glacier or not. If wearing crampons doesn’t increase your security, you should stow them until the conditions change.
It is common to start a climb early in the morning when snow slopes are thoroughly frozen. In a temperate climate, as the day unfolds, rising temperatures and direct sunlight on the snow can rapidly change frozen snow to soft snow or mush. Recognize when crampons are no longer needed and take them off.
When wet snow begins to ball up on the bottom of a crampon, the possibility of slipping and falling becomes very real. If the snow is soft enough, consider removing your crampons. In some cases a thin layer of wet snow on top of ice or hard snow makes crampons essential. For this reason mountaineers should always employ crampons equipped with anti-bot plates. These plastic inserts help keep snow from balling up between the crampon spikes.
The crampons you choose should be compatible with your boot and should be appropriate for the objective. If you elect to wear crampons with a toe bail or a heel bail/clipper, confirm that the rand/welts on the boot are appropriate for these crampons before you leave for the mountains. Try pulling down on the center bar and pulling the front points side to side. Does the crampon shift or lose contact with the boot, even if the sole is flexed? If the crampons do not fit securely, they must be adjusted or a different crampon/boot combination should be chosen. Never ignore a badly fitting crampon or just hope that it will improve.
Tripping is a significant hazard with crampons, often a result of the frontpoints snagging on clothing or gear. It’s not uncommon to see climbers wearing gaiters on the wrong feet, with the buckles on the inside of the legs—this provides a prominent place for a frontpoint to catch, causing a stumble. Be sure extra crampon straps are tucked away and that—if not wearing gaiters—the cuff of your pants has a low profile. (Many modern mountaineering pants have grommets to attach elastic cords that run under the boots, eliminating the need for bulky gaiters.)
Once you put on your crampons, you should continually focus on good technique, using thoughtful and controlled steps. Running down a slope, climbing while tired, or stepping out of balance are all good ways to either trip or stab yourself with a crampon point.
French Technique (Flat Foot)
French technique is the art of flexing the ankle so provide purchase for all of the crampon points on the bottom of your boot. Most modern crampons have 10 points on the bottom and two frontpoints on each toe. An individual employing proper French technique will engage all 10 of the bottom points to create a high level of security in the step. This is also referred to as the flat-foot technique or, in French, pieds à plat.
In hard snow or icy conditions the flat-foot technique may be used in combination with both the duck walk and a diagonal ascent. The techniques are the same as described without crampons, with one significant difference: You must flex your ankles sideways so that all of the crampon points bite into the surface.
American Technique (Hybrid or Pied Troisième)

As the slope angle increases (usually above 45°) it becomes difficult to maintain diagonal French technique without shifting the toe of your boots so radically downhill—in order to engage all of the crampons’ bottom teeth—that you end up walking up the slope backward. Moving this way is physically demanding and isn’t terribly secure.
Instead, shift one foot out of the French stance and engage the frontpoints in the snow. The other foot should remain flat-footed against the slope. This technique allows you to face the slope and move quickly, while saving the strength in your calves. As the calf in the frontpoint position tires, simply switch feet and allow the pumped calf to rest in a flat-footed French position while the rested foot and leg take over the frontpointing.
Austrian Technique (Frontpointing)
The third crampon method is the Austrian technique, or frontpointing. This technique is reserved for very steep angles—usually in excess of 70°—though some climbers prefer it on somewhat lower-angled terrain.
Frontpointing requires one to kick their crampons straight into the slope, and then to drop the heels approximately 10° below a level stance. Dropping the heels engages not only the frontpoints but the next two points on the crampon as well. The result is that a climber stands on four points, instead of just two, which increases the stability of the placements.
Frontpoint crampon technique tires the calf muscles, and because fatigue is a significant contributor to slips and falls on snow and ice, climbers should use the American technique rather than frontpointing whenever it’s reasonable.
USING AN ICE AXE
Many mountaineers tend to see the ice axe primarily as a tool for self-arrest. But an ice axe should be used primarily to increase security while climbing, in order to decrease the likelihood of a fall. Being able to execute a good self-arrest is important, but the first goal is always not to fall.
Ice Axe Choice
For mountaineering routes, a straight-shafted axe with a gently curved pick and no molded plastic grips or handles, roughly 60 to 70cm long (depending on the climber’s height), will provide the most versatility and security for snow travel, self-arrest techniques, and creating snow anchors.
However, many climbers opt for shorter technical tools for alpine routes and ice climbs, even those that may require serious snow travel en route or during the approach or descent. Some technical tools work better than others in such applications. Consider tools with lower-profile finger guards and grips, a generous spike, and a less radical curve to the shaft.
Leashes
In most mountaineering settings, there is no compelling reason to leash an ice axe to your wrist. The tool is always to be carried in the uphill hand, and using a leash requires the climber to switch the leash to the other hand every time he changes direction on a diagonal ascent. This takes time, decreases security, and takes focus off the task at hand. In most settings, the danger of dropping an ice axe is lower than the risk of destabilization during a transition.
However, using a leash makes sense in contexts where the likelihood of a drop increases. For example, when wearing mittens in extremely cold weather or on high-altitude climbs, a leash is imperative because of the lack of dexterity. (In some cases, it may be preferable to tether the axe directly to your harness, because switching a leash with bulky mittens and clothing can be nearly impossible.) When climbing steep ice, wearing some kind of leash or tether makes sense, because dropping an axe in such a setting could be catastrophic.
How To Hold the Axe: Cane Position vs. Self-Arrest Position
While climbing moderately steep snow, mountaineers have two primary choices of ice axe positions: carrying the axe in the cane position, with the pick forward, or carrying the axe in the self-arrest position, with the pick backward. It is not uncommon to hear climbers argue about which is better. But it’s clear which way is better: The cane position is better when you are actively climbing the mountain, and the self-arrest position is better when you are actively falling off the mountain.

All joking aside, the cane position (piolet canne) provides more stability and should be used in most cases while ascending, for two major reasons. First, it’s easier to firmly set the axe’s spike in the snow when you have the palm of your hand seated comfortably on the flat surface of the adze. Placing the spike effectively in hard snow with the axe in the self-arrest position will eventually bruise the palm of your hand on the narrow edge of the pick, causing you to be less aggressive with the axe. Second, as the angle of the slope increases, it is more natural to transition from the cane position into one of the dagger positions with the axe.
Obviously, one will be slightly slower to move into a self-arrest with an ice axe in the cane position. Some would argue that this compromises one’s safety. But the best way to address that compromise is to practice self-arrest from the cane position until it is second nature and can be employed as effectively as from the self-arrest position. Switch to the self-arrest position only when there is an obvious danger—like crossing a heavily crevassed area on a rope team or traversing a very steep slope—when the climber must be prepared to self-arrest.
Self-Belay Position (Piolet Manche)
The self-belay or “deep plunge” position is a secure technique for steep snow climbing. The axe is pushed down vertically into the snow as deeply as possible, while you continue to hold the head of the tool. The head of the axe becomes a handhold. (In French, manche means “handle” or “sleeve.” Imagine the shaft of the axe down in a sleeve of snow that will keep it in place, creating a good handle.)
There are two ways to hold the axe while employing this technique. In softer snow, when the majority of the shaft is buried, you can hold the head of the axe with both hands. This is very secure.
If the snow is too hard or icy for the axe to penetrate very far, it isn’t effective to have both hands on the head because in a slip you may simply lever the spike out. Instead, one hand can be placed on the head of the axe while the other grips the shaft at the point where it disappears into the snow. In the event of a slip, the hand on top of the axe should push forward, while counter pressure is applied to the hand that is lower on the shaft. In other words, you should be pushing in on the top and pulling out with the hand just above the spike. If pressures are applied correctly, the slip will be arrested by this technique before it becomes a fall.
Anchor Position (Piolet Ancre)
Occasionally a climber will need to make a quick placement with the pick of his axe in order to pull over a bulge or assist with a crevasse crossing. To do this, hold the axe in your dominant hand just above the spike and swing it over your head like you’re pounding in a nail. Right at the end of the swing, flick your wrist forward; this will allow the pick to bite more deeply. Once the pick is placed, you can use both the shaft and the head of the axe as handholds while you climb up over your obstacle.
Low, Middle and High Dagger Positions
On steep snow and ice, most commonly on terrain between 45° and 70°, one or more of the dagger positions may be useful. The climber holds the ice axe at the top of the shaft or on the head while seating the pick of the axe in the snow. Dagger positions work well in hard snow or on névé, but are less effective on hard ice, where the only way to create an effective pick placement is to swing the axe.
The first of these three techniques is the low dagger position, or piolet panne. In this position, place the palm of your hand on the top of the adze as you press the pick into the slope at waist level. This is a quick technique that doesn’t require any changes to the way you hold your ice axe, assuming you started out in the cane position, but it doesn’t feel as secure as some other techniques because the pick is so low. It will be most useful for downclimbing.
In the middle dagger position (piolet appui), place your hand on the shaft of the axe right below the head. This position allows you to push the pick into the slope more forcefully, making each stick feel more secure.
In the high dagger position (piolet poignard), hold the head of the axe, wrapping your fingers over the pick in front of the shaft while you wrap your thumb under the adze behind the shaft. To place the axe, reach high and stab the pick into the slope. A high dagger placement often provides better security on very steep slopes than the other two dagger positions.
Self-Arrest
Failure to self-arrest is a common contributor to the incidents found in these pages, and many climbers are almost obsessively fixated on their ice axe as a tool to arrest a fall. But many times a slope is too steep or the snow too hard or icy for an effective self-arrest. Think of an icy slope of 40° or more and you’ll get the picture: The falling climber starts sliding too quickly to control a slide.

When a fall takes place, a mistake has already been made. Therefore, as we’ve said before, although it is important to practice self-arrest it is perhaps more important to practice the art of not falling. Work on proper foot technique, practice using the ice axe as an aid to decrease the likelihood of a fall, and develop situational awareness by paying attention to your surroundings and managing risk on exposed terrain.
Your risk management strategy should take into account both the condition of the snow and the angle of the slope. In soft snow conditions, even on 40° terrain, a self-arrest may be effective. But in icy conditions, even on a lower-angled slope, a self-arrest may well be unsuccessful. If it doesn’t appear that a self-arrest will be feasible, you may have to alter your climbing strategy, including roping up and belaying or choosing an alternate line.
Depending on the circumstances, you may end up sliding down the slope after a slip in any number of different ways: feet-first on your back, head-first on your stomach, etc. It doesn’t matter how you fall, the goal is the same: Roll into a self-arrest position with the shaft of the axe across your body, place the pick in the snow, look away from the adze, then torque the spike up while lifting with your legs. This should bury the pick deep in the slope’s surface and bring you to a stop. It’s beyond the scope of this article to explain self-arrest in depth: Seek instruction and practice repeatedly. Find a low-consequence slope and take a variety of mock slips and falls in varying positions to get the hang of it. Building good instincts takes repetition.
Most climbers practice self-arrest with a standard alpine piolet. These ice axes were designed with self-arrest in mind and work well for it. Shorter, technical ice tools are not as easy to manipulate into the self-arrest position, and the picks may skitter off hard snow or ice. Those who climb with technical tools should practice self-arrest with such tools until it is second nature.
One great debate over the practice of self-arrest is whether the climber should kick his feet up during an arrest, in order to ensure he doesn’t get flipped over by his crampons, or whether he should bury his toes into the snow no matter the cost. Many climbing clubs still teach the former technique, whereas most guides now teach the latter.
In the event of a fall, the most important thing is to stop. Style points don’t matter. Indeed, even injury doesn’t matter. What matters is that you fight with everything that you have in order to arrest a fall.
DESCENDING ON SNOW
Many snow-climbing accidents occur while descending. Often this is because the climber is tired and not paying attention to the surroundings and the conditions under foot. It is important to stay alert on the way down, and to focus both on the slope below you as well as on your feet.
Plunge Step
The plunge step is an aggressive and direct way to descend a slope of soft snow. Think of it as reversed step kicking. To do it effectively, bend your knees slightly, spread your feet shoulder width apart, and step straight downhill, striking the slope with the heel of your boot. The heel will cut into the snow and create a platform for the rest of the boot.
In harder snow conditions, it is imperative that the heel aggressively hits the slope on every step and that the toe is pointed slightly upward. Try to plunge down and kick back to achieve the proper step. Often people who are not aggressive plunge-steppers may slip and then become more timid in their steps, which leads to more falls and more timidity. If you fall once, don’t back off—be more aggressive in your steps to ensure that your heel cuts deeply enough to create a secure step.
Most climbers will feel comfortable with the plunge step in soft conditions on slopes up to about 40°. In semi-hard conditions, aggressive plunge-stepping should be reserved for slopes that are 35° or under. If the conditions are too hard to plunge-step securely, descending with crampons is a better option.
Shuffle Step
If the terrain is steeper or more exposed, climbers may resort to the shuffle step to increase the security of their descent. This technique is not fast, but is very secure and can be done with crampons on or off, depending on the conditions.
Face perpendicular to the slope and step down with your downhill foot. Now move your uphill foot down into the step your downhill foot occupied a moment earlier. Your ice axe should be in your uphill hand in the cane or self-arrest position, with the spike planted firmly in the snow. Once your feet are next to one another, move the ice axe down, planting the spike once more.
Downclimb
Downclimbing steep slopes on frontpoints or with American (pied troisième) technique is often faster than setting up a rappel. Indeed, in conditions where it’s hard to build a good rappel anchor, downclimbing may even be safer.
Some climbers might feel comfortable downclimbing 60° snow, while others wouldn’t dream of it. If one member of a team is uncomfortable downclimbing a given slope, it may be better to belay him and then solo down. Alternately, you might consider setting up a rappel for the entire team.
Descending with Crampons
The biggest thing to remember when descending with crampons is that it is easy to trip over a gaiter, shoelace, or pant leg while walking or plunge-stepping downhill. For this reason, it is important to splay the toes of your crampons out a little bit on the descent and keep your two feet away from each other. Also, beware of snow balling up under the crampons. From an in-balance position, knock snow off the crampons by banging the sides of them with your ice axe or by kicking one crampon against the side of the other.
Glissading
Many mountaineers ascending lower-angled mountains look forward to the adventure of glissading down snow slopes after their climb. There are three types of glissade that a climber can employ: standing glissade, three-point glissade, and sitting glissade. But losing control of a glissade is a contributing factor to many accidents. Following four guidelines can help minimize the risk.
Never glissade with crampons on. People get injured every year because they wear crampons while glissading. If you’re wearing crampons, it’s probably icy, and if it’s icy you probably shouldn’t be glissading. Second, and perhaps more importantly, if you’re wearing crampons while glissading quickly, you could easily snag a spike on hard snow or ice, with the possibility of breaking an ankle or leg.
Never glissade while tied into a rope team. If you are roped up, it should be because there are hazards that require a measured and controlled approach. Sliding down the hill is the antithesis of measure and control.
Never glissade on a glacier. If you are on a “wet” glacier, then it is likely that you are roped up to manage the crevasse hazard. The preceding rule states that glissading while roped up is never advised. If you’re not roped up, glissading on a glacier opens the possibility of a crevasse fall, which almost always has severe consequences.
Always make sure you can see where you’re going. You should not glissade if there is any fog or rollovers to negotiate. Glissading off a cliff, into a moat, or onto talus is a terrible way to end your day.
SNOW CLIMBING STRATEGIES

There are many snow-climbing situations where climbers may choose to move together while roped to one another. The most common is to protect against a crevasse fall. But this technique also may be used to protect a team from a fall down snow or ice through the use of a running belay.
To rig a running belay, the leader places snow or ice protection and then clips the rope to it. As the second approaches, he can either clip the rope behind him as he passes the protection to safeguard the remaining climbers or—if on a two-person team—remove the protection. If an individual on the team falls, he may pull the others off, but the protection between the climbers will theoretically arrest the fall, limiting the damage of the incident.
In some settings, it might be more efficient and perhaps even safer for the climbers on a team to unrope and “solo” a slope. Imagine a slope that’s not steep enough to require belaying individual pitches, and that, in order to move quickly, you make a team decision not to employ a running belay. On steep or icy slopes where self-arrest is unlikely, the slip of a single climber roped to the rest of the group could result in the loss of the entire team. In such a situation, it might be safer for the individual climbers to unrope.
The decision to unrope should not be made lightly. First, you must consider the reasons that you employed a rope in the first place and determine if those risk factors are still valid. Second, you must feel confident in the ability of each member of your team to solo the slope safely. If you have any doubts about a team member’s skill, you should continue to use the rope and either employ running belays or stop and belay each climber up or down the slope.
Timing the Climb
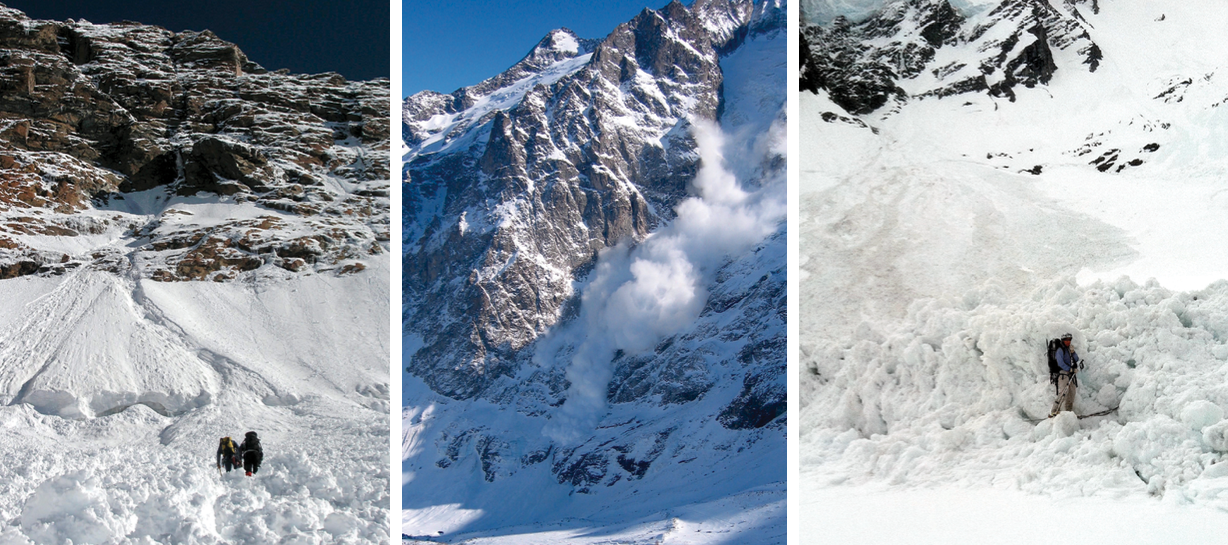
Many accidents take place because of unstable snow. In a spring or summer context, this often includes the combination of wet slide avalanches, collapsing cornices, and weak snow bridges over crevasses. These dangers may be mitigated by an early morning ascent.
On glaciated peaks and on peaks with a lot of objective hazard, it’s not uncommon for spring and summer climbing teams to leave camp between midnight and 4 a.m. Teams should estimate how long it will take to climb the mountain and descend, and then plan a departure early enough to ensure they are off the snow before the sun dangerously warms the slopes.
During the colder months and in colder regions, parties often elect to climb during the day. The cooler temperatures provide a margin of safety that is similar to that experienced by night climbers in the spring and summer. However, it is not uncommon for temperatures to warm and for parties to have to adapt their schedules to the weather. Those who do not adapt to the conditions put themselves at risk.
Ideally, mountaineers will encounter firm, easily climbed snow during the ascent and softer snow—but not too wet or soft—for a rapid, easy descent. Timing a climb to find such conditions is a key aspect of the craft of mountaineering.
Making Good Choices
Effectively moving on snow involves a matrix of skills and decisions. An individual who has mastered such techniques will not be immune from appearing in these pages under the heading that reads “fall on snow,” but he or she will certainly be much less likely to have an accident.
Most importantly, a casual, “make it up as you move along” approach to snow travel is not safe. You will most successfully deal with each slope angle and each type of snow or ice under foot by applying a specific technique, and the techniques required can change repeatedly over a relatively short distance. When you have learned and practiced the complete repertoire of fundamental skills discussed here, you always will be making “best choices” for each step of your climbs.
ABOUT THE AUTHORS
Dunham Gooding founded the American Alpine Institute in 1975 and has taught courses and guided expeditions in the Cascades, Canada, Ecuador, Bolivia, and Patagonia. He has served as chairman of the National Summit Committee on Mountain Rescue, president of the American Mountain Guides Association (AMGA), and president of the Outdoor Industry Association. Jason D. Martin is the director of operations and a senior guide at the American Alpine Institute. He is on the board of directors of the AMGA and has written two guidebooks and co-authored Rock Climbing: The AMGA Single Pitch Manual.
Special thanks to Bryan Simon, who helped analyze snow-travel accidents reported in the past decade of Accidents editions.